
March 15, 2022
How to Change Shopify Store URL to Your New or Existing Domain
Uniform Resource Locator or URL is simply an address that the site visitors will see if they come to your website. Actually, the URL directs the traffic to your webpage or resource and there is always a resource connected with the URL. Shopify eCommerce Web stores usually come with a uniform store-name.myshopify.com address. We always recommend using your custom domain as it establishes your credibility and authority in your customer’s perception. To change the Shopify store URL, go to Settings > Domains, add your new/existing domain, and then set it as primary. For your .myshopify.com URL, go to Settings > General (only changeable within 14 days of store creation).
This blog post will guide you on how you can change the existing Shopify URL to a custom one.
How to Change Shopify Store URL to a New Domain: Steps to Change Your Domain
Before changing your Store URL, save a copy of your store data and inform your customers about the upcoming changes. To change Shopify URL to a new domain, follow the below steps:
1. Add the New Domain to Shopify
Open your Shopify admin panel and navigate to settings. Then, find Domains and click "Buy or connect a domain". Pick one of these: "Buy new domain" (from Shopify) or "Connect existing domain" (if from another place):

2. Set the New Domain as Primary
After that, locate your Buy new domain and choose the set as primary. Finally, confirm the change:

3. Configure DNS Settings (for third-party domains)
In the case that your domain is not from Shopify, edit the DNS records with your current domain host. Insert all of the necessary records from Shopify; these include (A record and CNAME). Finally, allow propagation period (up to 48 hours).
4. Set Up URL Redirects
First of all, go to Online Store > Navigation. After that, redirect old URLs to new versions to maintain SEO. Finally, use bulk redirects for quick updates across multiple URLs.
5. Update Other Settings
Change the store's canonical URLs. After that, update internal links throughout the site. Finally, change the old marketing materials to reflect the new domain.
6. Verify the Change
Access the newly added domain from different internet browsers and test for functionality. After that, confirm the visibility of all pages. Finally, verify that the changes are functional.
How to Change Shopify Store URL to a Previously Existing Domain
If you wish to attach a domain that you already possess (registered through other domains like GoDaddy, Namecheap, or Google Domains) to your Shopify Store Development, please adhere to the following instructions.
Step 1: Prepare Your Existing Domain
First, visit your domain registrar, unlock the domain and turn off WHOIS privacy if it's currently activated. Finally, retrieve your domain privacy notes for your domain registrar.
Step 2: Connect the Domain in Shopify
From the admin page in Shopify, select Settings followed by Domains. After that, select Connect existing domain:

Furthermore, input your domain (for example, "yourstore.com"), then click Next:
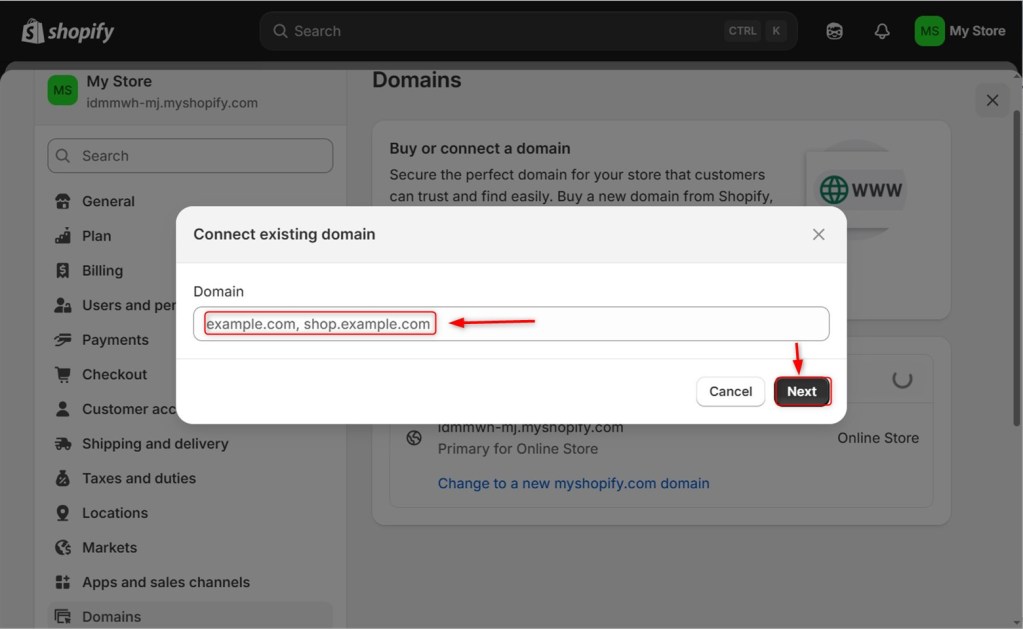
Finally, select Connection Automatically if your registrar is supported (GoDaddy, Google Domains, etc.); otherwise, select Connect manually.
Automatic Connection (for supported registrars)
You will be redirected to the domain provider’s site, where you can log in and authorize the connection. Finally, your DNS settings will be automatically optimized by Shopify.
Manual Connection (for unsupported registrars)
You will be provided with records that you must append on Shopify:
- A record: Point to IP address, which is Shopif's IP.
- C-name record: Point www to shops.myshopify.com.
Log into the Domain Registrar control panel and head to DNS settings. After that, make changes to the DNS records by adding the provided records while deleting or suspending conflicting existing records. Finally, select Verify connection in Shopify.
Step 3: Set as Primary Domain
After verification, which may take up to 48 hours, return to Settings > Domains. After that, locate your domain and click Set as primary. Finally, confirm this change.
Step 4: Set Up Redirects
Implement 301 redirects from the previous domain to the new one. In Shopify, navigate to Online Store > Navigation > URL Redirects. Finally, add redirects for all important pages to preserve SEO.
Step 5: Final Checks
Test the domain using an Incognito browser. After that, verify the SSL certificate is active (auto-provisioned by Shopify). Finally, ensure any existing email services function as intended.
How to Change the Shopify Store URL?
Depending on which URL you want to modify, there are two main ways to change your Shopify URL: your permanent Shopify admin URL (myshopify.com) and your primary domain (what customers see).

Option 1: Changing Your Primary Domain (What Customers See)
It is the recommended way to change your store's public-facing URL:
- Purchase a new (domain from Shopify or a third party).
- In your Shopify admin, go to Settings > Domains.
- Click Add Domain and either Buy a new domain through Shopify or Connect an existing domain you own.
- Once added, click Set as Primary on your preferred domain
- Shopify will automatically redirect visitors from your old domain to the new one.
Option 2: Changing Your myshopify.com URL (Admin URL)
This can only be done within the first two weeks of creating a store and only once.
- Navigate to Settings > General.
- Under Store Details, click "Change" next to your myshopify.com URL.
- Your new preferred URL must be entered as a suggested URL.
- Then click “Save.”
Remember to set up 301 redirects from old URLs to maintain SEO rankings after the switch.
Conclusion
To change your Shopify store URL to a new or existing domain, At your Shopify admin, go to Settings > Domains. Click Change domain type. Select Primary domain. Click Change domain type to save. If you need to change your permanent myshopify.com URL (only possible within the first 14 days of store creation), navigate to Settings > General and click "Change" next to your current .myshopify.com address.
Frequently Asked Questions
Q1: How to manage Shopify merchants in a woocommerce store?
To manage Shopify merchants in WooCommerce Development, use a multichannel integration app like Codisto or Shopify to WooCommerce Migration tools. After that, Sync products, orders, and inventory manually via CSV or automate with plugins like WP All Import.
Q2: How can I get a pre-built Shopify store?
You can buy a pre-built Shopify store from marketplaces like Exchange by Shopify, Flippa, or Empire Flippers. Alternatively, Hire a Shopify Developer or IKONIC Dev to create a custom pre-built store for you.
Q3: Best shopify apps for clothing stores?
Best Shopify Apps for Clothing Stores, Printful, Bold Product Options, Loox Photo Reviews, ReConvert Upsell, Kiwi Size Chart.
Q4: How to list pre-owned items on Shopify?
To list pre-owned items on Shopify, go to Products > Add the product in your Shopify admin.
Fill in details, select "Used" or "Preowned" condition, and publish. For better results, mention the condition clearly in the title/description and use high-quality photos.
Q5: Best react native mobile app for shopify store?
The best React Native mobile app for Shopify stores is the Shopify Mobile app. Alternatively, consider React Native templates like Tapcart or Plobal Apps for Shopify Customization solutions.
Q6: Do I need an EIN for Shopify?
No, Shopify doesn't require an EIN, but you may need one for tax purposes in your country.
Q7: How to clear the Shopify cache?
To clear Shopify cache, go to Online Store > Themes, then click Actions > Clear cache. Alternatively, append ?cache=clear to your store URL (e.g., yourstore.com?cache=clear).
Q8: How to set up shopify automated accounting?
To set up Shopify automated accounting, go to Settings > Apps, install an accounting app like QuickBooks or Xero, and then connect it to sync orders and financial data automatically. For native Shopify Integration, enable Shopify Tax and Shopify Payments in Settings, then link to accounting software via the Shopify Store.
Q9: How to change Shopify Store URL to your New or Existing Domain?
First, go to Settings > Domains in your Shopify admin, click "Add domain" to connect or purchase your new domain, then set it as your primary domain to make it the public-facing URL.
Get a Quote
Start Your Affordable Development & Maintenance Plan Today
Get expert development, maintenance, and peace of mind — all at affordable rates. Start your support plan today!
Book a Call


